
Key takeaways
• Machine vision inspection turns a camera into a pass/fail decision, not a photo. It images every part on the line, runs a model on it in well under a second, and tells a PLC to keep the part or kick it off — grading 100% of units at line speed instead of a hand-checked sample.
• The method decides what you can catch. Rule-based vision measures and reads codes deterministically; deep learning judges cosmetic defects the way an eye would; anomaly detection trains on good parts alone to flag the defect you’ve never seen. Most real lines run a mix.
• Accuracy is a favourable-condition ceiling, not a promise. Vendors cite 97–99% and it’s real — on a lit, mounted, representative part. The number that runs your line is the balance between escapes (a bad part ships) and overkill (a good part is scrapped), and you set it deliberately.
• The camera is the easy part. Lighting, optics, false-reject tuning, and the tie-in to the PLC and MES decide whether a system works — not the model. A defect the camera can’t see is a defect no algorithm will catch.
• Buy a smart camera for one check; build a system when inspection is the product. Off-the-shelf tools fit a fixed, well-defined check. A custom build wins when you own the model and data, span many lines or products, or need inspection inside a platform you control.
A plant manager wants one thing from an inspection station: to stop shipping the defect that just triggered a customer complaint, without putting three more people on the line. A quality engineer wants proof that every unit was checked, not a clipboard sample. A product team building an inspection device wants a model they own and can retrain, not a black box locked to one vendor’s hardware. All three are asking the same underlying question — how do you turn a camera pointed at a moving part into a reliable, defensible pass/fail decision? That is what machine vision inspection does.
We’ve built real-time video and computer-vision systems since 2005, including live object-recognition camera work and real-time incident detection on production video. So this is the engineering guide, not a sales pitch: how machine vision inspection actually works, how the detection methods really differ, why accuracy is a tradeoff you tune rather than a badge you buy, how the main tools compare, and when it’s smarter to buy a smart camera than to build a system.
Scoping an inspection system?
Tell us the part, the defect you’re chasing, and the line speed, and we’ll tell you honestly whether to buy a smart camera or build a custom system — with the accuracy and false-reject tradeoffs behind the call.
Why Fora Soft wrote this guide
We’re a video and AI software company: 250+ projects since 2005, a team of 50+ in-house specialists. A large share of that work is the exact plumbing an inspection system needs — capturing a live camera feed, running computer-vision models on it in real time, and turning what the model sees into a clean signal another machine can act on. Machine vision inspection is that pattern pointed at a production line, where the signal is a pass or a fail and the machine acting on it is a reject arm.
Two of our projects sit close to this problem. In our custom object-recognition camera work we built the detect-and-classify layer that a defect detector shares, and with Mindbox we shipped real-time incident detection on live video — the same discipline of running inference on a stream fast enough to act on it. Inspection is a demanding cousin of that work: instead of flagging a rare event, you judge an ordinary one thousands of times an hour, and a wrong call costs money in both directions.
We don’t sell a boxed inspection product, so there’s nothing to push here. For a single, fixed check (a barcode read, a cap-present test), a smart camera off the shelf is usually the right answer, and we’ll say so. What we build through our computer vision development services is the custom version, the multi-line or product-embedded system, which means we’ve earned the right to be honest about when you don’t need one.
What machine vision inspection actually is
Machine vision inspection is software that images a manufactured part, analyses it against a trained model or a set of rules, and produces a decision, conforming or defective, fast enough to act on before the next part arrives. The camera is often ordinary; the intelligence is the software and the way the part is lit and presented to it. When the same idea is applied to circuit boards it’s usually called automated optical inspection (AOI), checking solder joints, component presence, and placement, but the pipeline is the same.
It’s worth clearing up one naming collision early, because it sends people to the wrong guide. “Quality assurance” in software means testing code before release; that’s a different discipline we cover in AI in software quality assurance. This article is about quality control of physical goods — a camera inspecting parts on a line, not a test suite inspecting a build. If you landed here looking for automated software testing, that link is your guide; if you’re inspecting real objects, keep reading.
The value is coverage and consistency. A human inspector checks a sample and tires within an hour; a vision system grades every unit the same way at 2 p.m. and 2 a.m. That’s why the technology moved from a lab curiosity to a line standard: it’s the only way to inspect 100% of output at production speed without hiring a shift of people to do it.
The short answer: buy a smart camera, build a system
If you have one fixed, well-defined check on one line (is the label present, is the cap on, does the barcode read), buy a smart camera or a turnkey vision sensor. Cognex, Keyence, and others sell these precisely for that job, and they’ll be running in days. Building anything custom for a single deterministic check is over-engineering.
You build a system when inspection is your product or your differentiator: you sell an inspection device, you run many lines or many products and want one model estate you can retrain, you have cosmetic or rare defects that need a data-centric deep-learning approach you own, or you can’t send images to a vendor cloud for compliance or IP reasons. The rest of this guide is how each of those calls is actually made — starting with how the pipeline works.
How machine vision inspection works: capture, infer, decide
Every inspection system, from a $3,000 smart camera to a custom multi-camera cell, runs the same short pipeline. A part arrives; a camera captures it under controlled lighting; a model (rules, deep learning, or anomaly detection) analyses the image; the system scores the result, decides pass or fail, and signals a PLC to keep the part or reject it. The whole loop finishes in well under a second, because the next part is already coming.
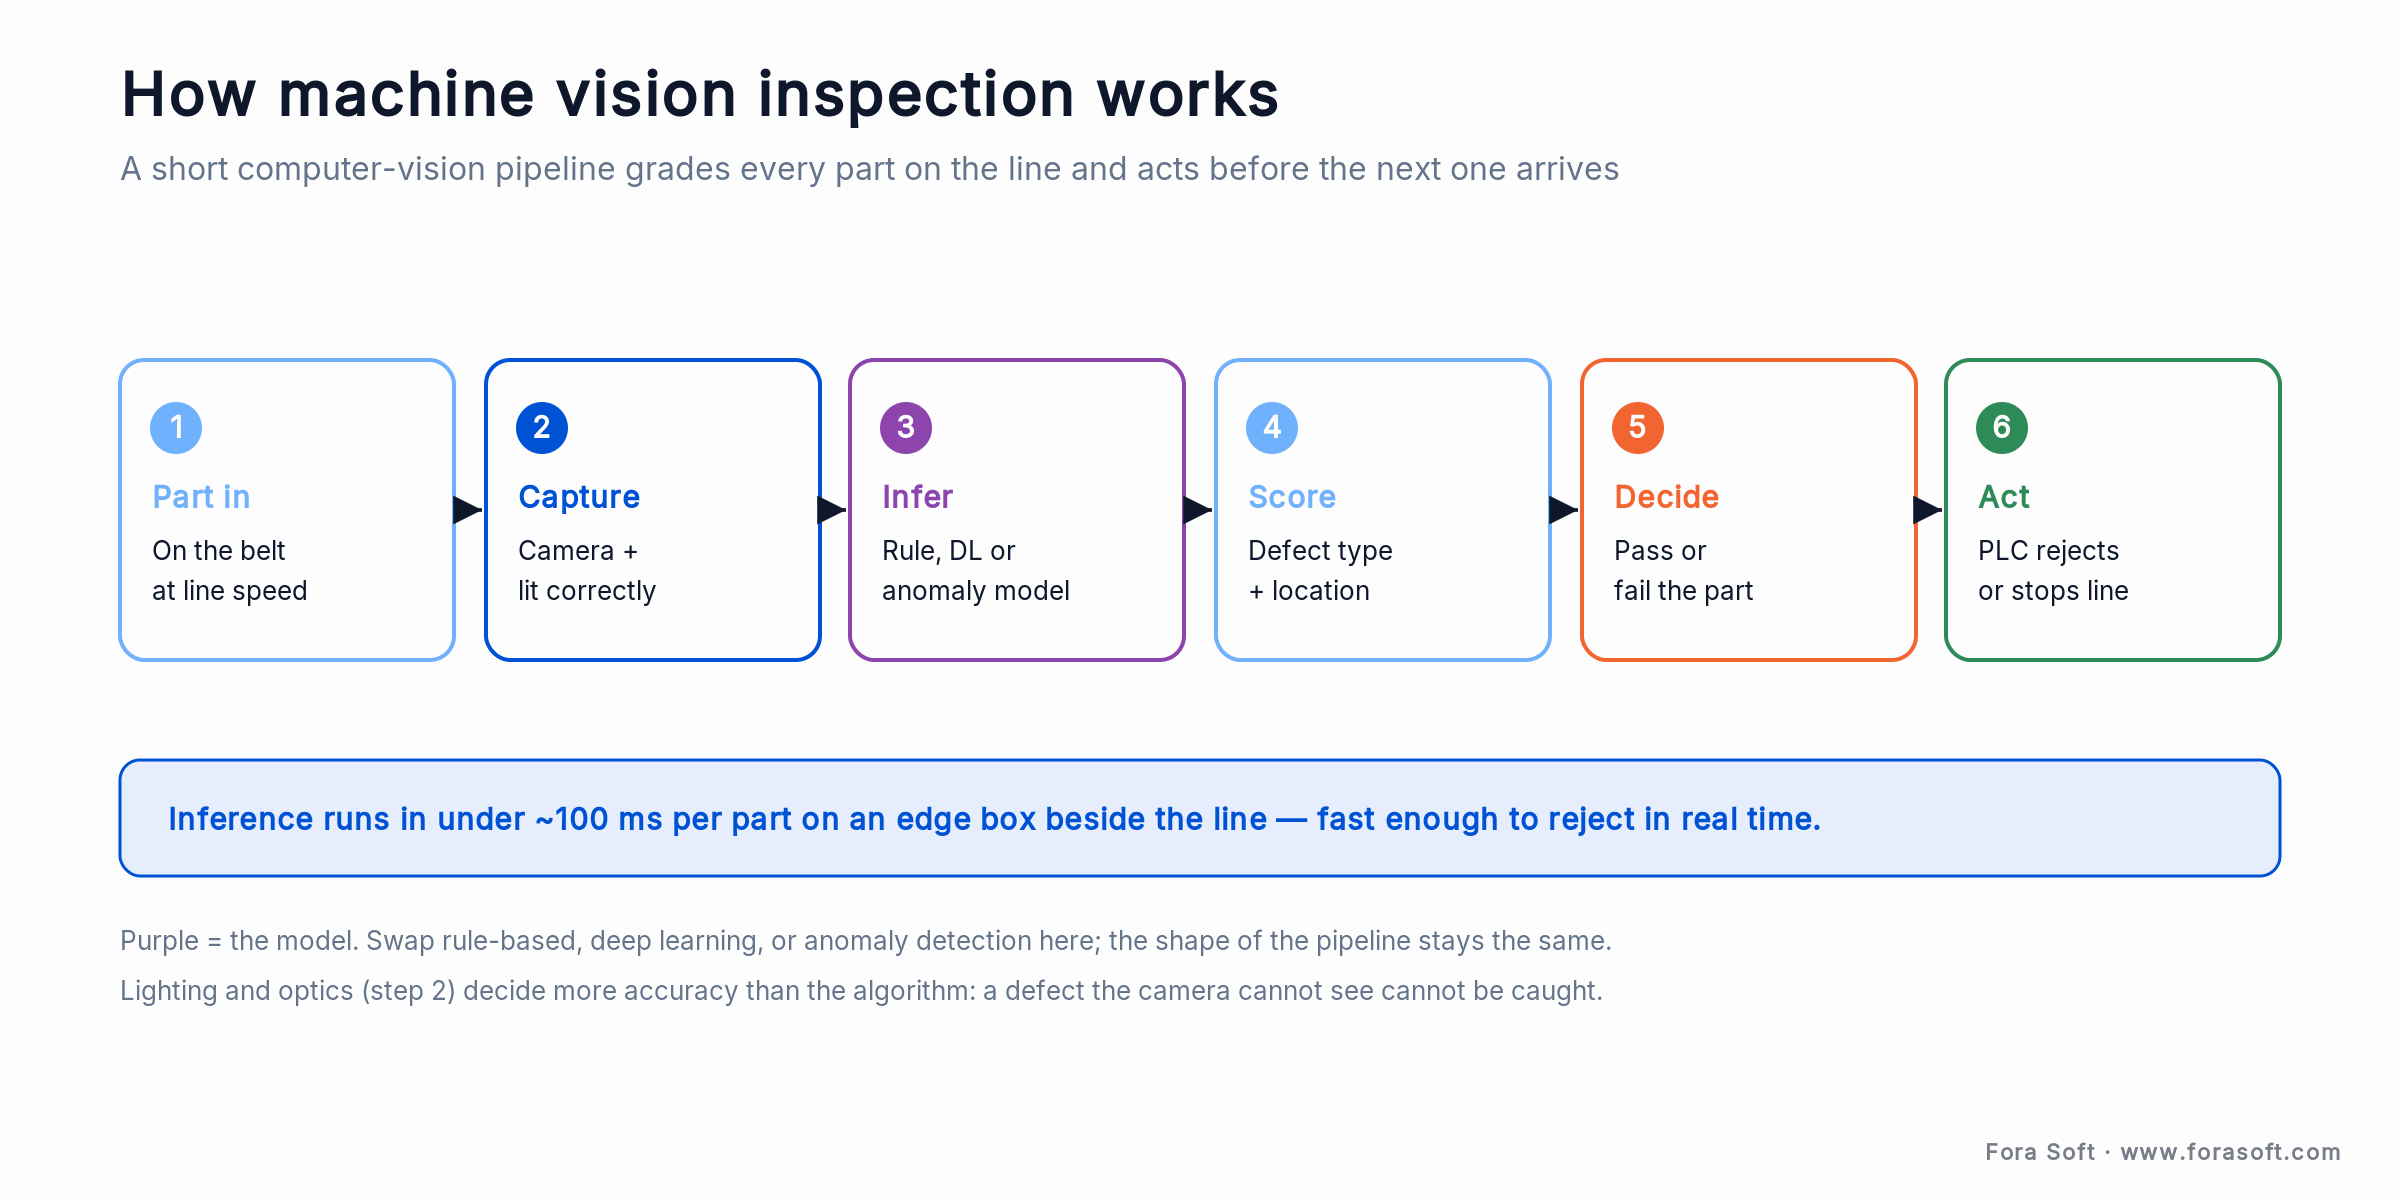
Figure 1. The inspection pipeline. Swap the model in the middle (rule-based, deep learning, or anomaly detection) and the shape stays the same; lighting and optics at capture decide more than the algorithm.
The unglamorous parts carry the system. Capture has to be deterministic: the part triggers the camera at the same position every time, the exposure is fixed, and the image is sharp at line speed, which usually means strobed lighting and a global-shutter sensor so a moving part doesn’t smear. Get that wrong and no model can recover the detail. This is the same real-time-capture discipline we describe in real-time video processing with AI: the model is only as good as the frame it’s handed.
Inference is where the method choice lives, and it’s usually the fast part. A defect-detection model runs per image in roughly tens of milliseconds on a modern edge accelerator, comfortably under the ~100 ms budget most lines allow, which is what makes real-time rejection possible. The decision layer then turns a raw model output into an action: a confidence score, a defect class, a location, and a threshold that says fail. That threshold is not a detail — it’s the dial that runs the line, and we come back to it below.
Rule-based vs deep learning vs anomaly detection
There are three ways to decide whether a part is good, and the most common mistake is reaching for the newest one by default. Each solves a different problem, and the strongest lines run more than one at once.
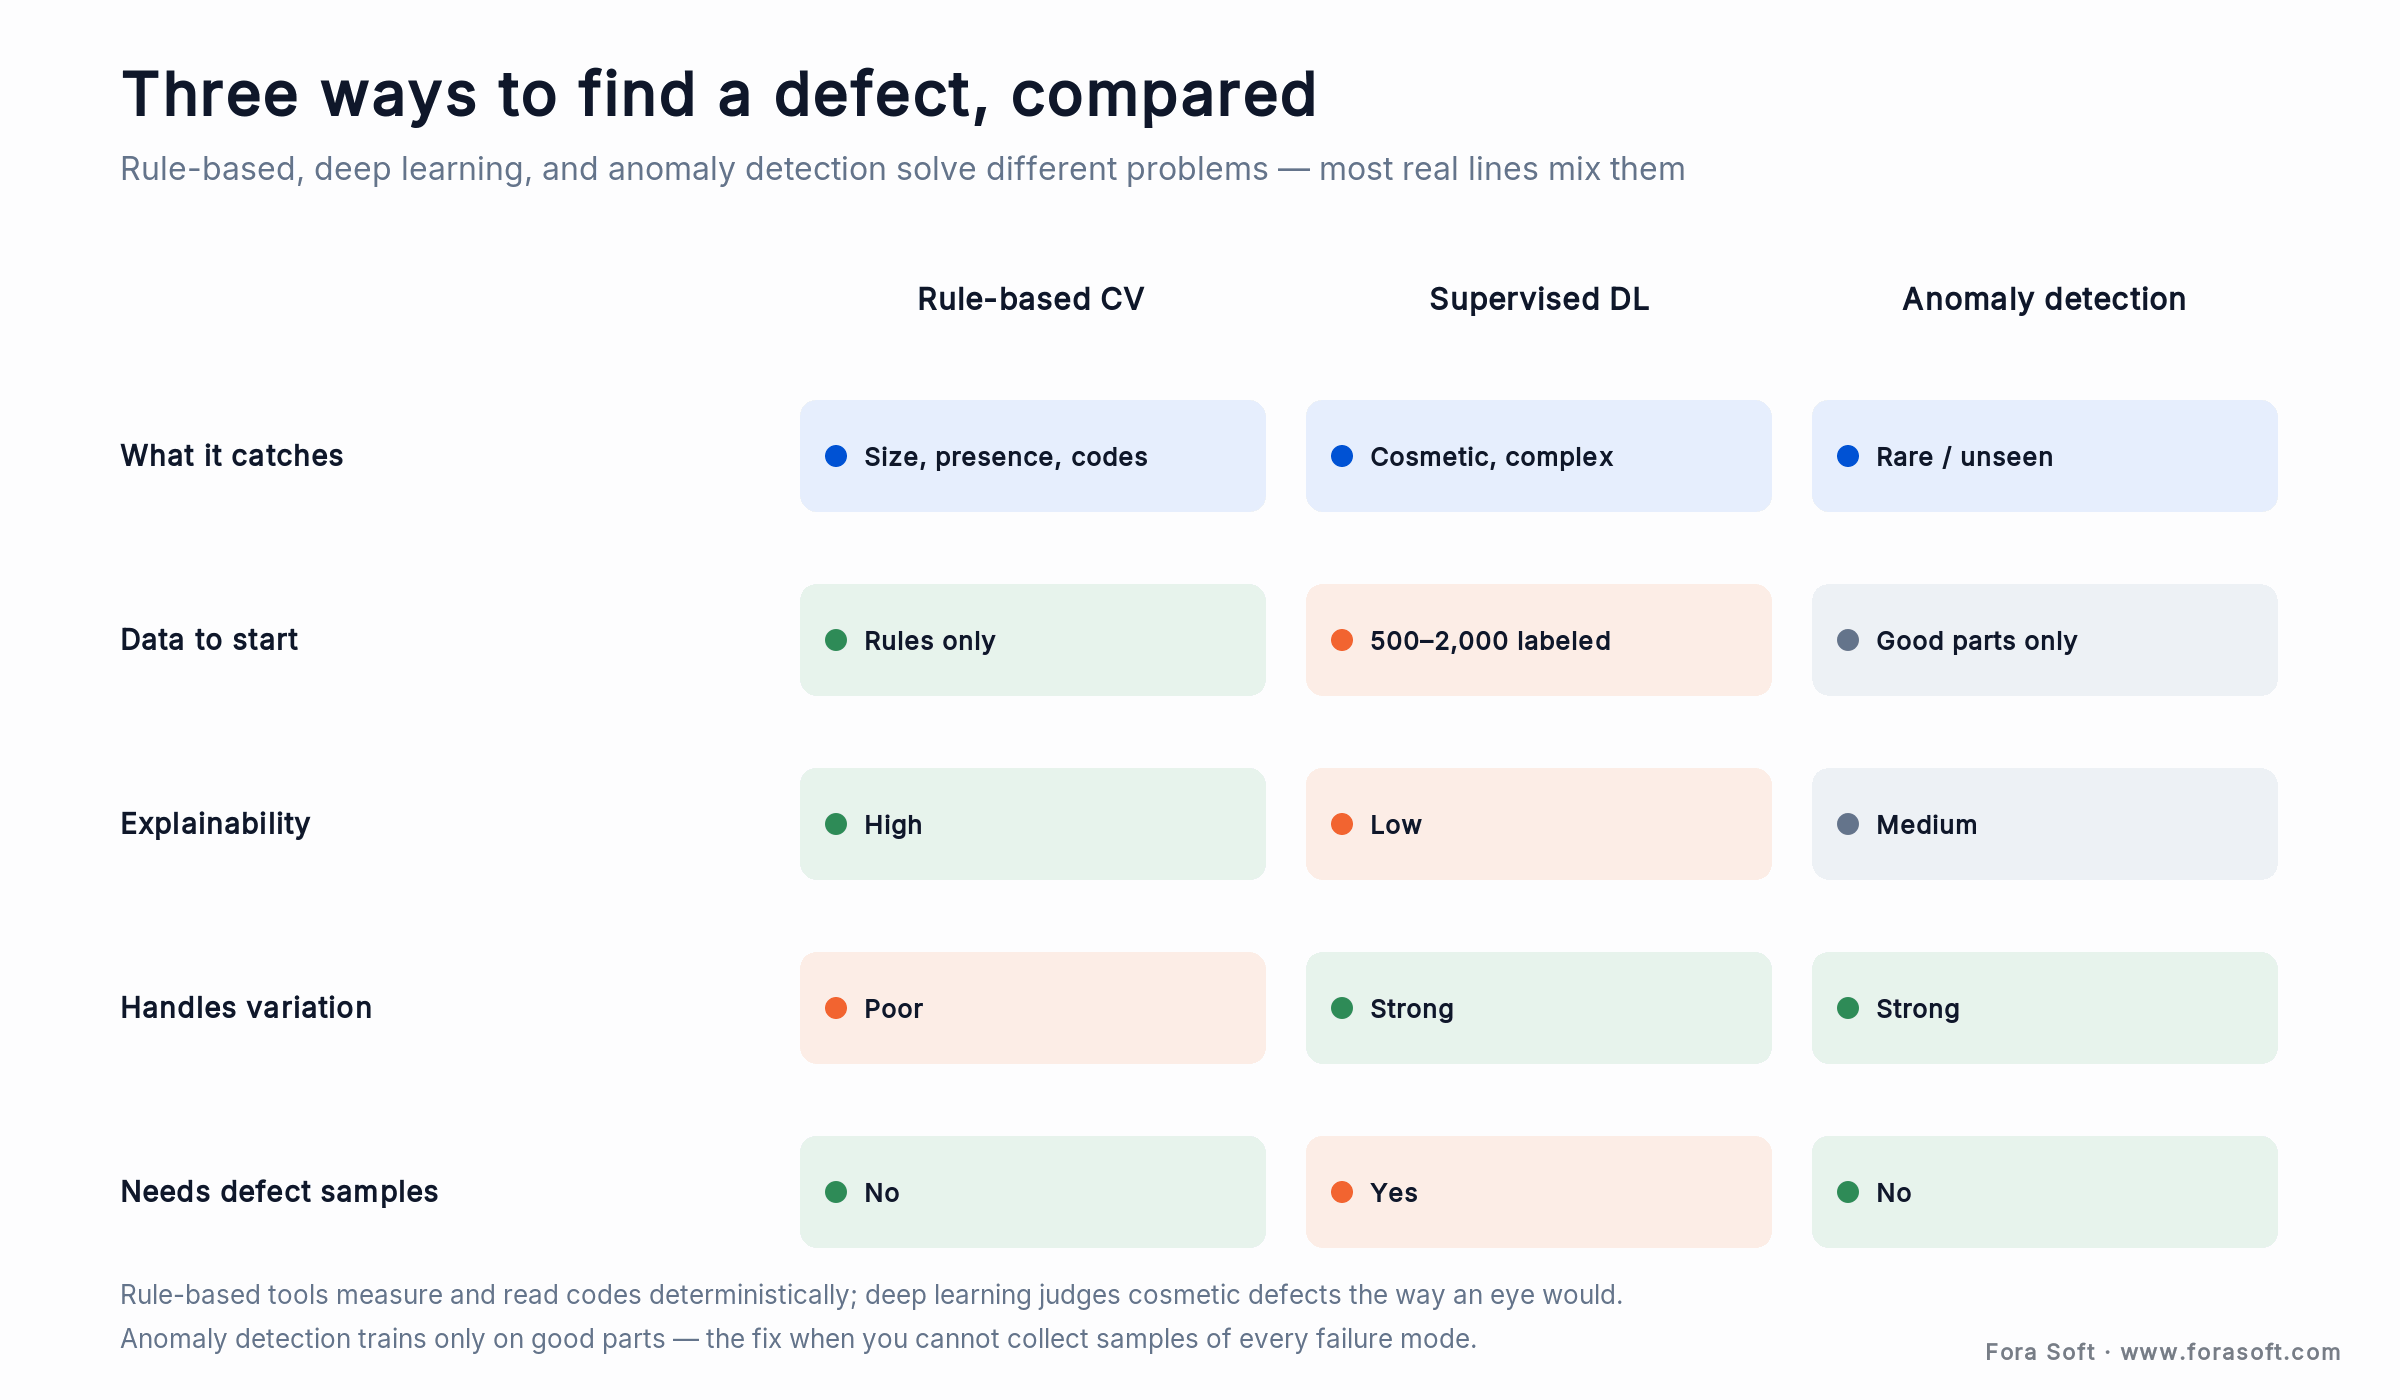
Figure 2. Three detection methods, compared. Rule-based measures, deep learning judges, anomaly detection flags the unseen — most production lines combine them.
Rule-based (classical) vision encodes an expert’s criteria as explicit measurements: edge positions, blob areas, distances, angles, barcode and OCR reads compared against fixed tolerances. It needs no training data, it’s fully explainable (you can point at exactly why a part failed), and it’s the right tool for metrology, presence/absence, alignment, and code reading. Its weakness is variation: every criterion is hand-coded, so a part that varies naturally, or a defect you can’t define as a rule, defeats it.
Supervised deep learning trains a model on labelled images, commonly a few hundred to a couple of thousand examples per defect type, to recognise defects the way a trained eye would. It shines on cosmetic and complex defects: scratches, dents, texture flaws, stains, natural-material variation that no rule captures cleanly. The cost is data and honesty about it: you need real defect examples, careful labelling (inconsistent labels cap the model’s achievable precision), and a GPU or edge accelerator to run it. It’s also less explainable, which matters when an auditor asks why a part failed.
Anomaly detection is the quiet workhorse for the defects you can’t collect. You train it only on good parts; it learns what “normal” looks like and flags anything that deviates. That’s the fix for rare, previously unseen, or hard-to-enumerate failures, where gathering a balanced set of defect images is impractical because the defect happens once a month. It won’t name the defect the way a supervised classifier can, but it will catch the one you never anticipated.
Reach for a hybrid when: your part has both hard specs and a cosmetic surface — say, a bottle that must be filled to a measured level and free of label scratches. Let rule-based tools handle the measurement and code read, and run a deep-learning or anomaly model in parallel on the same image for the cosmetic call. Forcing one method to do both is where accuracy and cost both go wrong.
How accurate is machine vision inspection, really?
Vendors and industry write-ups commonly cite 97–99% detection accuracy for inline systems, against roughly 80–85% for tired human inspectors who let an estimated 15–20% of defects slip through. Those numbers are real, and the coverage gap is the bigger story: a machine grades 100% of units, a person grades a sample. But treat any headline accuracy figure the way you’d treat a lab benchmark — as a ceiling measured on a favourable install, not a promise for your busiest line at shift change.
The gap between a spec sheet and a real line is where deployments succeed or fail. A model measured on a clean dataset can lose real accuracy on a live line because the lighting drifts through the day, parts arrive at slightly different angles, a new supplier’s material reflects differently, or a defect class simply wasn’t in the training set. The honest question isn’t “how accurate is the algorithm?” but “how accurate is it on this part, lit this way, at this speed, including the defects we haven’t seen yet?”
Two rules follow. First, validate against ground truth before you trust it: run a known set of good and defective parts through the system and measure what it catches and what it wrongly fails. Second, plan for retraining. A supervised model is not a one-time install — new defect modes and new materials mean you’ll relabel and retrain, which is exactly why owning your data and model matters once inspection is core to your business.
False rejects vs escapes: the tradeoff that runs the line
A single accuracy percentage hides the decision that actually matters. Every inspection system makes two kinds of mistake. An escape (false accept) is a defective part that passes and reaches the customer, the expensive one, because it turns into returns, recalls, or a safety incident. Overkill (false reject) is a good part the system wrongly fails, the wasteful one, scrapping yield and adding rework labour. You can’t drive both to zero at once.
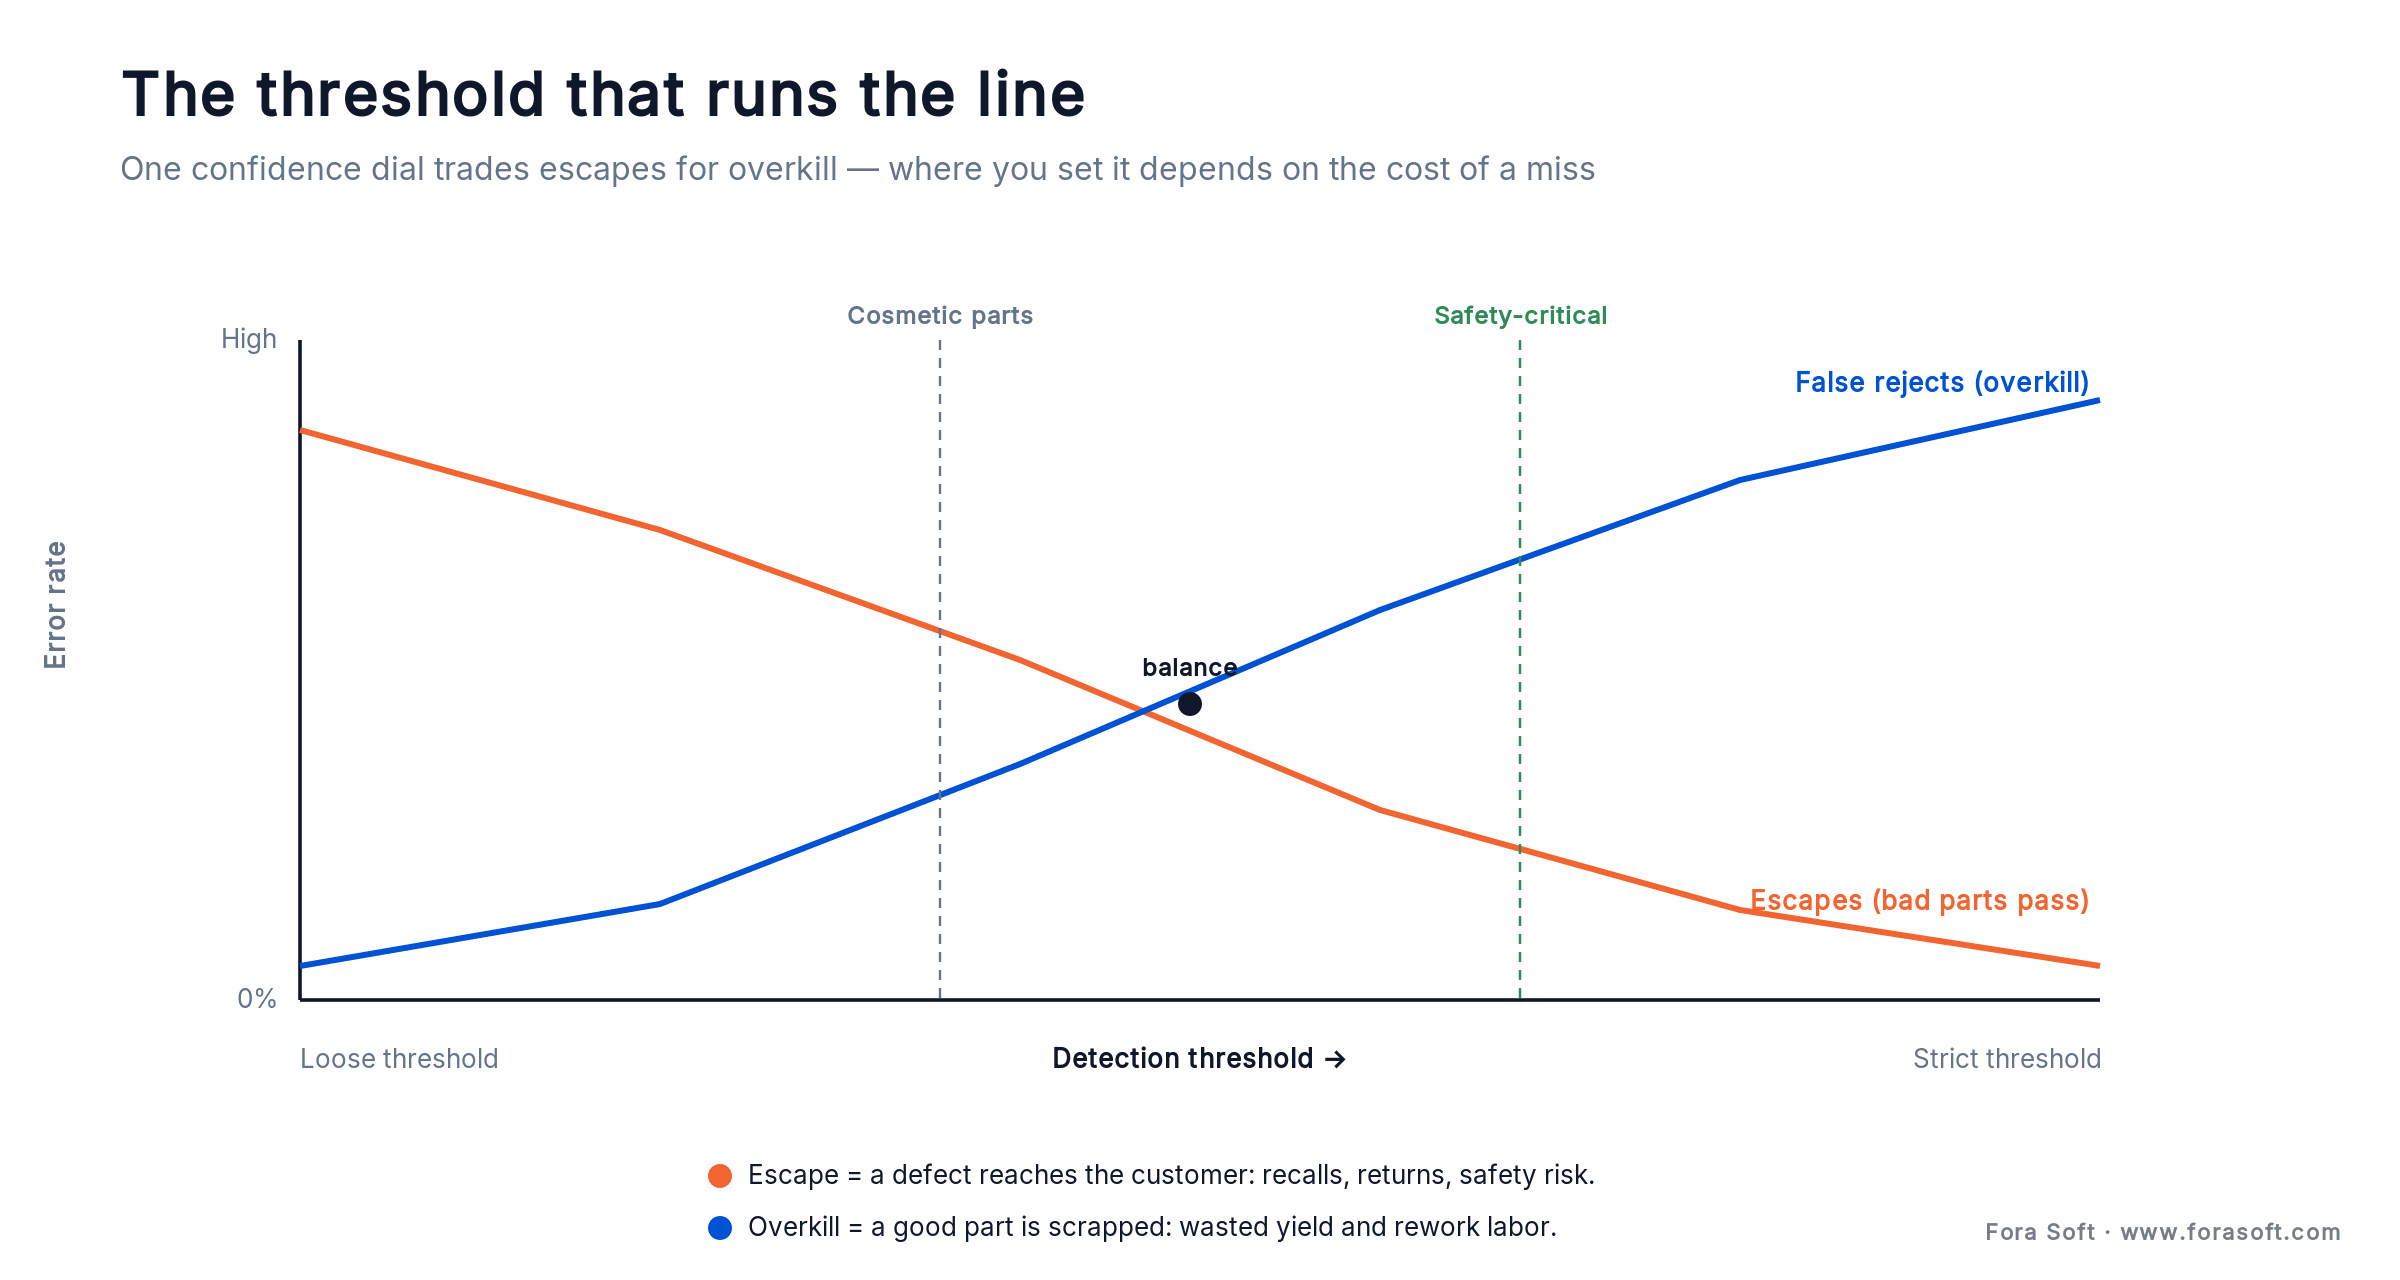
Figure 3. The threshold dial. Loosen it and defects escape; tighten it and good parts get scrapped. Where you sit depends on what a miss costs.
The two errors are linked by one confidence threshold. Raise it and the system only fails parts it’s very sure about — fewer good parts scrapped, but more borderline defects slip through. Lower it and you catch more defects at the cost of failing more good parts. There is no universally correct setting; there’s only the setting that’s right for the cost of a miss on this part. A cosmetic blemish on a low-value item can tolerate a looser threshold; a crack in a safety-critical component cannot.
A worked example makes the arithmetic concrete. Say a line runs 10,000 parts a shift at a true defect rate of 1% — 100 real defects. Tune for an aggressive 99.5% detection and you catch about 99 or 100 of them, but if that setting also fails 3% of the 9,900 good parts, you scrap nearly 300 good units a shift as overkill. Loosen the threshold to fail only 0.5% of good parts and overkill drops to about 50, but your detection might fall to 95%, letting five real defects escape. Which is worse depends entirely on what a scrapped part costs versus what a shipped defect costs.
A common production target cited in the field is under 2% false rejects while holding 98%+ true detection, but that’s a starting point, not a law. The engineering job is to make the threshold a deliberate, documented business decision — and, where the two costs are far apart, to add a second look: route borderline parts to a human or a secondary model instead of forcing one threshold to serve both cheap and critical defects.
Lighting, optics, and when you need 3D
If one section of this guide changes how you scope a project, let it be this one: in machine vision inspection, lighting and optics decide more accuracy than the algorithm. A defect that isn’t visible in the image cannot be caught by any model, and most “the AI isn’t working” problems are really “the defect was never lit so the camera could see it” problems.
The craft is matching the lighting technique to the defect. Diffuse lighting flattens glare on shiny parts; coaxial (on-axis) light reveals scratches on flat reflective surfaces; dark-field lighting rakes across the surface to throw scratches and edges into relief; backlighting turns a part into a silhouette for precise dimensional measurement. Structured light and laser projection add height. Picking the wrong one doesn’t just lower accuracy — it can make a whole class of defect invisible, which is why a proof-of-concept on the actual part, under candidate lighting, beats any spec-sheet comparison.
Reach for 3D when: the defect is a shape, not an appearance — a dent, a warp, a missing weld bead, a coplanarity or gap measurement, a volume check. 2D imaging reads patterns on a surface; 3D machine vision (stereo, structured light, or laser profiling) reads geometry, so it catches defects that a flat picture literally cannot show. It costs more and runs slower, so use it where height or shape is the defect, and stay 2D where a surface pattern is.
Optics matter alongside light. Resolution has to resolve the smallest defect you care about with several pixels to spare, the lens and working distance have to hold focus across the part, and a global-shutter sensor plus a strobe freezes motion at line speed. None of this is glamorous, and all of it is where budgets should go before anyone argues about which neural network to use.
The tools compared: Cognex, Keyence, HALCON, Landing AI, custom
There’s no single best machine vision inspection software — the market splits by how much you want to own versus how fast you want to start. The table below reflects each option’s public positioning captured on 2026-07-16; most vendors price by quote, so verify current figures before you commit.
| Option | Type | Pricing (2026-07-16) | Where it wins | Where it breaks |
|---|---|---|---|---|
| Cognex (VisionPro + Deep Learning/ViDi) | Smart cameras + software; deep-learning add-on | Quote (In-Sight often <$5k–$20k+) | Tight PLC/EtherNet/IP integration; fast to commission | Base VisionPro has no DL; you buy the DL tool |
| Keyence | Turnkey vision systems + support | Quote (bundled) | Dead-simple setup; AI-assisted lighting/focus | Less customisation; you don’t own the model |
| MVTec HALCON | Developer library (any GenICam camera) | Quote by license | Broadest algorithms; strong 3D/metrology; flexible | Steep curve; needs vision engineers |
| Landing AI (LandingLens) | No-/low-code deep-learning inspection | Free tier + published tiers + enterprise quote | Data-centric DL without a research team | Still your data/labels; platform lock-in |
| Custom build | Your pipeline on your hardware | One-time build + hosting | You own model, data, and integration; no lock-in | Overkill for a single fixed check |
A useful way to read the table: Cognex and Keyence sell you a result fast and own the box; HALCON sells you a toolkit if you have engineers; Landing AI lowers the bar to deep learning while you still bring the data; and a custom build is the choice when the model, the data, and the integration have to be yours. The right pick follows from the build-vs-buy question, which is next.
Build vs buy: when a custom inspection system wins
Buying is the right default. A turnkey smart camera puts a working, supported inspection station on a line in days, with lighting and optics chosen for you and a PLC interface out of the box. For one deterministic check, or a handful of them, that’s where you should start — and often stay.
Building wins in a specific set of situations, and it’s worth being blunt about them. You build when inspection is the product you sell, so the model and its accuracy are your differentiator, not a vendor’s. You build when you run many lines or many product variants and want one model estate you can retrain centrally instead of a fleet of black boxes. You build when your defects are cosmetic, rare, or novel enough that a data-centric deep-learning or anomaly approach you control beats any fixed tool. And you build when images can’t leave your walls, for IP or regulatory reasons, so a vendor cloud is off the table.
Reach for a custom build when: you find yourself fighting a vendor tool’s limits — you can’t retrain on your own defects, you can’t get the data out, or the per-line licensing across a dozen lines now costs more than owning the system. At that point you’re paying custom-build money for a box you don’t control.
The honest middle path is common: buy for the easy 80% of checks and build for the 20% that are your actual competitive edge. A custom system doesn’t mean inventing computer vision from scratch — the detection and tracking pieces are proven and reusable, as our object-recognition camera guide lays out. It means assembling those pieces into a system whose model, data, and integration you own. That assembly is the daily work of our AI video recognition software team: detection, tracking and edge inference on hardware like NVIDIA Jetson, wired into your line.
What machine vision inspection costs, and the ROI math
We’ll give ranges and the logic, not a single number, because scope genuinely drives the figure (the part, the defect, the line speed, and how many lines), and quoting a precise price sight-unseen would be dishonest. Published industry estimates put a basic 2D smart-camera station around a few thousand dollars and an advanced AI-powered platform in the tens of thousands per line; a custom build is a larger one-time engineering cost that you own outright.
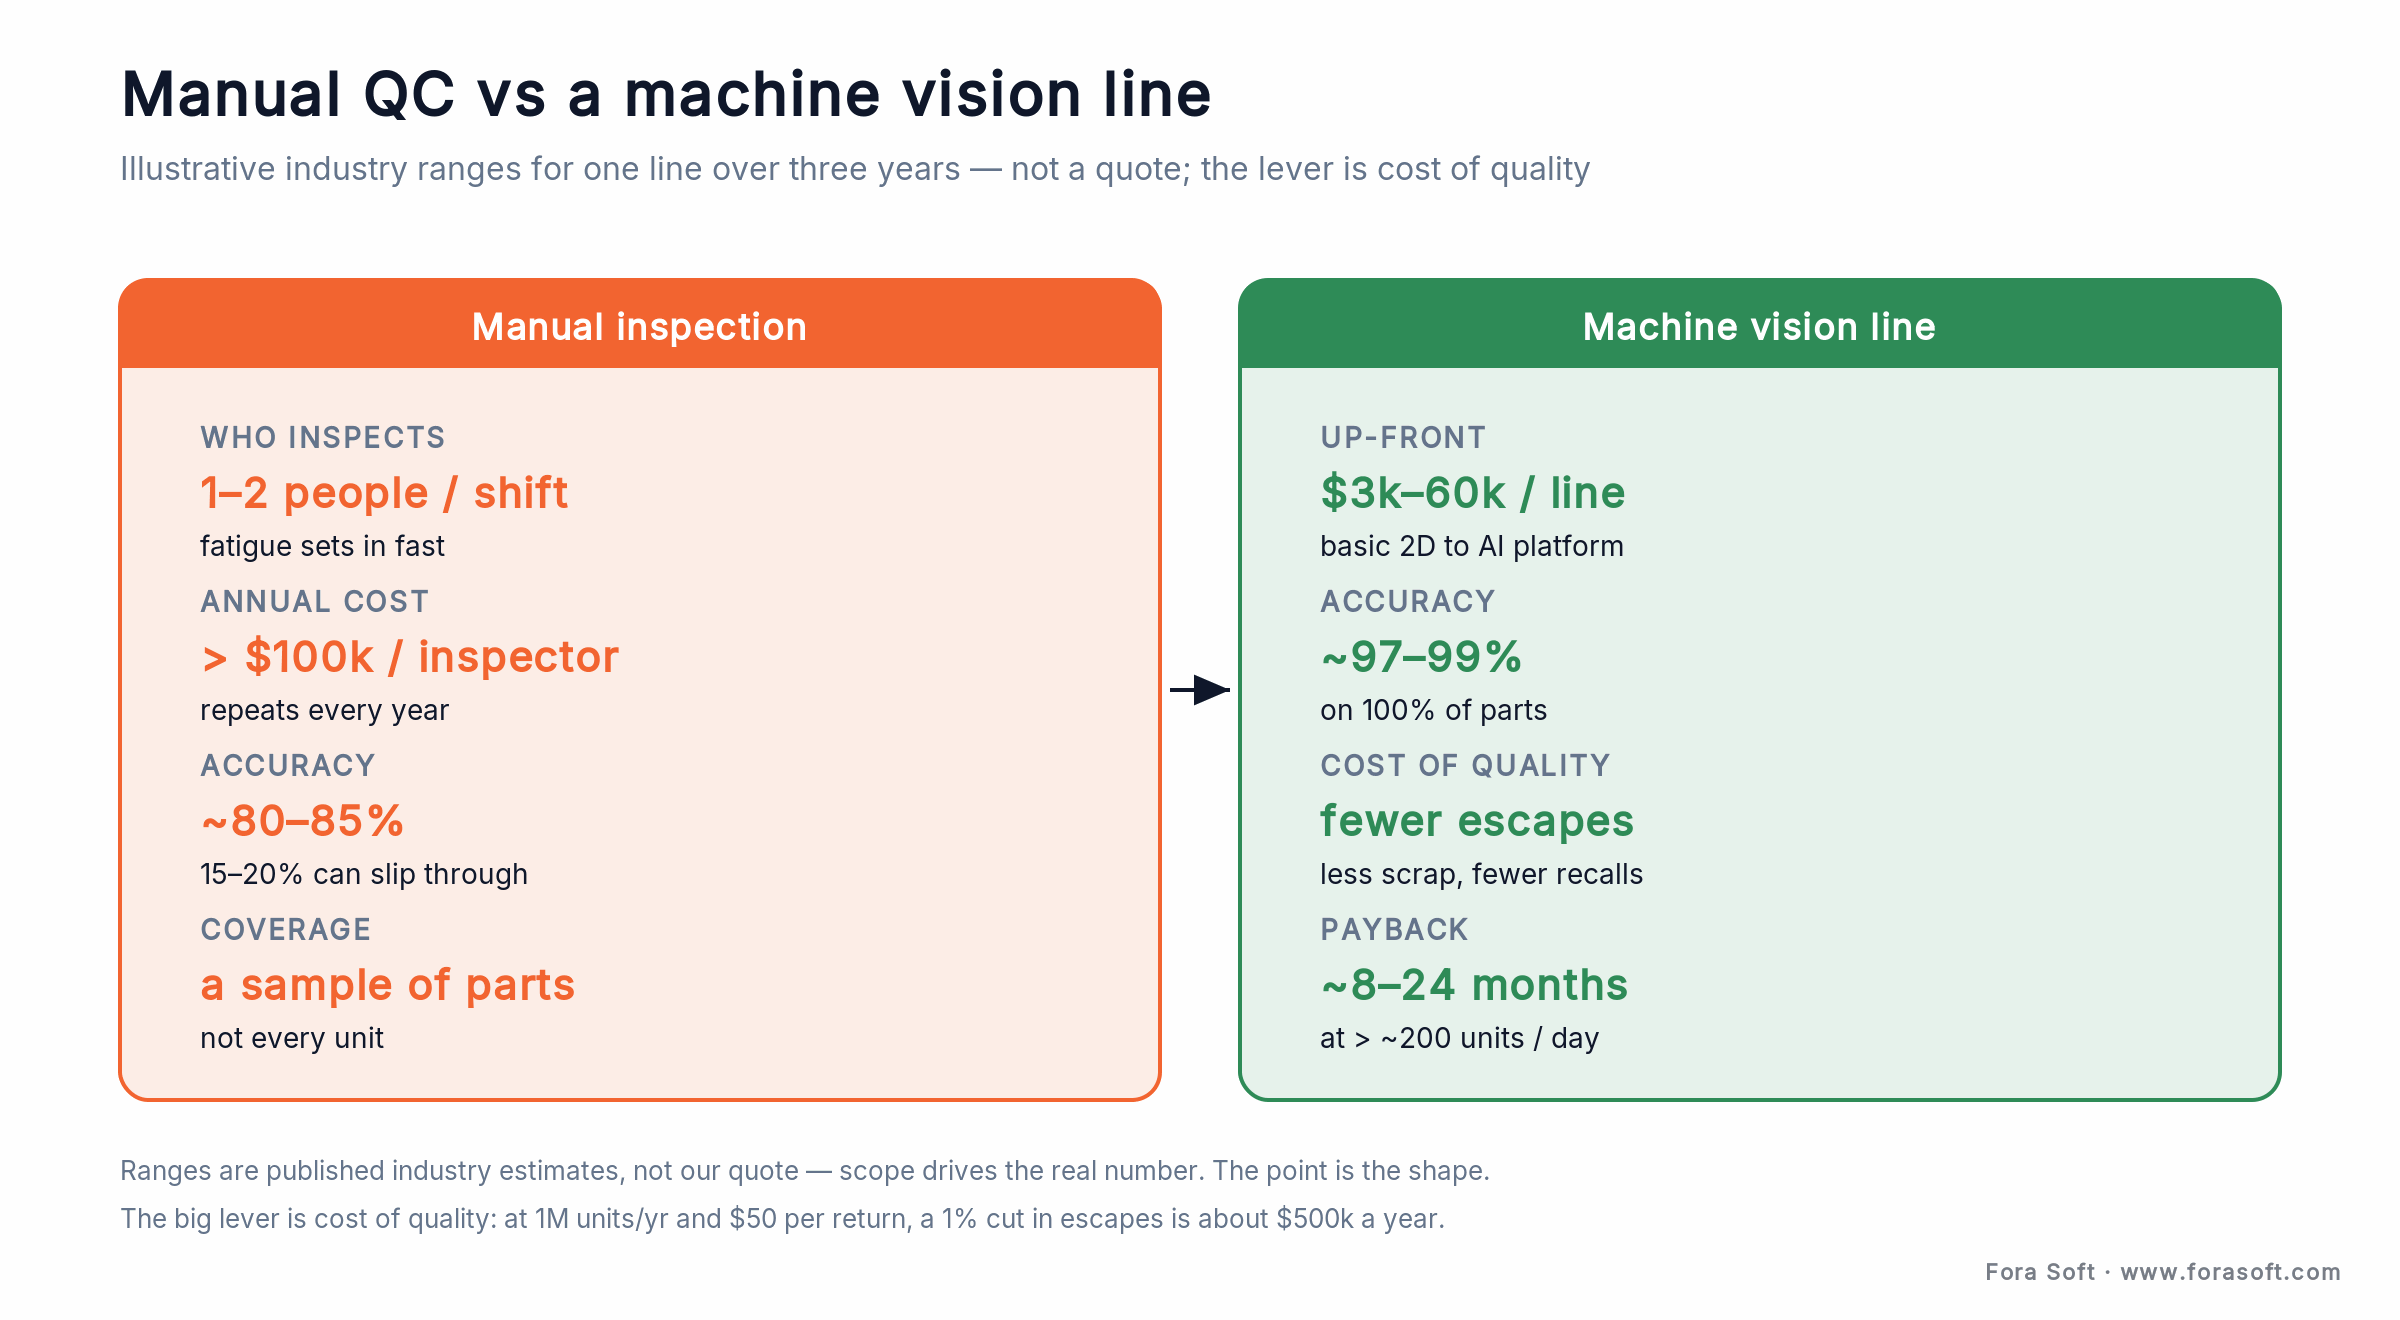
Figure 4. Manual QC vs a machine vision line, illustrative. Labour repeats every year; a vision line is mostly up-front, and the real lever is cost of quality.
The ROI rarely turns on labour alone, though the labour case is real: annual manual-inspection cost is often cited above $100,000 per inspector per line, it repeats every year, and it still only checks a sample at 80–85% accuracy. Vendor analyses commonly report payback within 8 to 24 months for volumes above roughly 200 units a day. Those are useful order-of-magnitude figures — treat them as industry estimates, not our quote.
The bigger lever is the cost of quality — the returns, scrap, rework, and recall exposure that escapes create. The arithmetic is stark: at 1,000,000 units a year and $50 per return, cutting your defect-escape rate by a single percentage point is worth roughly $500,000 a year. That’s why a system that lifts detection from a sampled 85% to a 100%-coverage 98% often pays for itself on avoided escapes long before the labour savings finish the job. Build the business case on cost of quality first, headcount second.
Want the numbers run on your line?
Send us your volume, defect rate, and what an escape costs you, and we’ll sketch the ROI and the buy-or-build call — no obligation, and we’ll tell you if off-the-shelf is the smarter spend.
Anatomy of a production inspection system
A production inspection station is more than a camera and a model. 1. Imaging. The camera, lens, and lighting chosen for the defect, plus a trigger sensor so the part is captured at the same position every time. 2. Capture. Deterministic frame acquisition at line speed (strobed light, global shutter, fixed exposure), the layer that decides whether the model ever sees the defect.
3. Inference. The rule-based, deep-learning, or anomaly model, run on an edge accelerator beside the line for deterministic latency. Whether that runs at the edge or in a nearby server is the same edge-versus-cloud call we cover in edge AI video architecture: inline inspection almost always runs at the edge, because a network round-trip blows the per-part time budget. 4. Decision. Scoring, thresholding, and defect classification into a pass/fail signal. 5. Actuation. The PLC hand-off that fires a reject arm or halts the line.
6. Data and MLOps. The part that separates a demo from a system: logging every image and decision, surfacing borderline cases for review, and retraining the model as new defects and materials appear. For deeper background on running vision models on live streams, our AI for video engineering primer covers the fundamentals. This feedback loop is why owning your data matters: a system that can’t learn from yesterday’s escapes is frozen the day it ships.
PLCs, MES, and closing the loop on the line
An inspection decision that nobody acts on is a screensaver. The value only lands when the pass/fail signal is wired into the line: a PLC over EtherNet/IP or PROFINET fires a reject actuator, diverts the part, or stops the conveyor when defects cluster. Getting this integration right, timing the reject to the part’s position on a moving belt and handshaking cleanly with the controller, is often more of the project than the vision itself, and it’s where turnkey vendors with native PLC support earn their premium.
Reach for MES integration when: quality data has to be traceable — you need per-unit defect records for audits, supplier scorecards, or to trace a recall to a batch. Feeding inspection results into a manufacturing execution system turns a reject arm into a quality dataset, and closes the loop from “we caught it” to “we fixed the cause upstream.”
The best inspection programs treat the data as an asset, not exhaust. Trends in defect type and location point at a drifting machine or a bad supplier lot before the scrap pile does; a spike in overkill flags a lighting or calibration problem before it eats a shift of yield. Closing that loop, from detection to root cause to a process fix, is what turns inspection from a cost centre into a quality-improvement engine.
How to run a first machine vision pilot
The fastest way to waste money on machine vision is to buy the system before you’ve proven the imaging. A good pilot inverts that: it spends its first effort on whether the defect can be seen at all, and only then on the model. Start by collecting representative parts — a stack of known-good units and, crucially, real examples of each defect you care about, including the rare ones, since those are what the system exists to catch.
Then prototype the lighting and optics on the actual part, not a rendering. Try the candidate lighting techniques against your worst defect and confirm it shows up clearly in the raw image; if it doesn’t, no amount of model tuning will save the project, and you’ve learned that cheaply. With a lit, sharp image in hand, label a starter dataset and train whichever method the defect calls for, then measure it against a held-out set of parts you didn’t train on, reporting escapes and overkill separately rather than a single accuracy figure.
Only after that evidence do you commit to hardware, PLC integration, and a rollout. A pilot done this way usually takes weeks, not months, and its real output isn’t a demo — it’s a defensible answer to whether the defect is catchable, at what false-reject cost, and whether you should buy a smart camera or build. That’s the same evidence-first approach behind the 90-day pilot in our object-recognition camera work.
Thinking about a pilot?
We can help you scope an evidence-first pilot that proves the imaging before you spend on hardware — and gives you a defensible buy-or-build answer at the end of it.
Mini-case: real-time object recognition on live video
The engineering that carries an inspection system is the same engineering behind real-time object recognition, and it’s work we’ve shipped. In our object-recognition camera projects, the core problem was exactly an inspection problem in disguise: take a live camera feed, detect and classify objects on it frame by frame, and produce a reliable decision fast enough to act on — the same detect, score, decide loop a defect detector runs, minus the reject arm.
With Mindbox we built real-time incident detection on live video, which is defect detection’s harder sibling: the “defect” is a rare event in a busy scene, the model has to run continuously on a stream, and a false alarm every few minutes makes the system useless — the operator stops trusting it and turns it off. Solving that meant the same discipline an inspection line needs: stable capture, low-latency inference, and a threshold tuned so the false-positive rate is low enough for people to act on the alerts.
The transferable lesson is that the model was never the hard part. The hard parts were feeding it clean frames in real time, keeping latency low enough to act within the moment, and setting the decision threshold so the system was trusted rather than muted. Move that stack onto a production line, add lighting designed for the defect and a PLC hand-off, and you have a machine vision inspection system — which is precisely why our real-time-CV experience transfers to it.
A machine-vision decision framework in five questions
Before you shortlist a vendor or scope a build, answer these five questions honestly. They decide most of the design.
1. Can you define the defect as a rule? If it’s a measurement, a presence check, or a code read, rule-based vision is cheaper, faster, and explainable. If it’s cosmetic or variable, you’re in deep-learning territory.
2. Can you collect defect examples? If defects are common and collectable, supervised deep learning fits. If they’re rare or unpredictable, plan for anomaly detection trained on good parts.
3. What does a miss cost, each way? Put a number on an escape and on a scrapped good part. That ratio sets your threshold and tells you whether a second-look step is worth it.
4. Is the defect visible in a 2D image, lit correctly? If it’s a shape or height, budget for 3D. Either way, prototype the lighting on the real part before anything else.
5. Do you need to own the model and data? If inspection is your product, spans many lines, or can’t send images to a cloud, you’re building. If it’s one fixed check, you’re buying.
When NOT to use machine vision inspection
Machine vision isn’t the answer to every quality problem, and pretending otherwise burns budgets. Skip it, or think hard, in a few cases. If the defect isn’t visible (an internal crack, a material property, a functional failure), a camera can’t help; that’s a job for X-ray, ultrasonic testing, or a functional test rig, not vision.
If your volume is low and your parts vary wildly, the economics and the engineering both fight you: a skilled human inspector is cheaper and more flexible than a system you’d have to reconfigure for every batch. Vision earns its keep on repetitive, high-volume, well-presented parts — not on a job shop making one-offs.
And don’t build custom for a single deterministic check that a smart camera solves out of the box — that’s spending engineering money to reinvent a product you can buy for a few thousand dollars. The custom path is for when you’ve outgrown the box, not for avoiding it in the first place. Honesty about these cases is exactly why a partner who’ll say “buy this instead” is worth more than one who sells you a build regardless.
FAQ
What is machine vision inspection?
It’s software that images a manufactured part under controlled lighting, analyses it with a rule-based, deep-learning, or anomaly-detection model, and produces a pass/fail decision fast enough to act on before the next part arrives. Inline, it grades 100% of units at line speed and signals a PLC to reject defective parts, replacing hand-checked sampling.
How accurate is machine vision inspection?
Inline systems are commonly cited at 97–99% detection accuracy, versus roughly 80–85% for human inspectors who also let 15–20% of defects slip through. Treat vendor numbers as favourable-condition ceilings: real accuracy depends on lighting, part presentation, and defect coverage, so validate against a known set of good and defective parts before you trust it.
Rule-based, deep learning, or anomaly detection: which one fits?
Use rule-based vision for measurements, presence checks, and code reads — it’s cheap, fast, and explainable. Use supervised deep learning for cosmetic or complex defects you can collect examples of. Use anomaly detection, trained only on good parts, when defects are rare or unpredictable. Most production lines combine them: rules for the deterministic checks, a learned model for the cosmetic call.
What’s the difference between a false reject and an escape?
An escape (false accept) is a defective part that passes inspection and reaches the customer — the costly error, since it drives returns and recalls. A false reject (overkill) is a good part wrongly failed, wasting yield and rework. They trade off against one confidence threshold: tightening it cuts escapes but raises overkill. You set the threshold by what a miss costs on that specific part.
How much does a machine vision inspection system cost?
Published industry estimates put a basic 2D smart-camera station at a few thousand dollars and an advanced AI platform in the tens of thousands per line; a custom build is a larger one-time cost you own outright. ROI is commonly cited within 8–24 months above ~200 units/day, but the biggest lever is cost of quality — at 1M units/year and $50 per return, a 1% cut in escapes is worth about $500,000 a year.
Is 2D machine vision enough, or do you need 3D?
Use 2D when the defect is a surface pattern — a scratch, stain, missing label, or misread code. Use 3D (stereo, structured light, or laser profiling) when the defect is a shape or height — a dent, warp, gap, missing weld, or volume check — because a flat image can’t show geometry. 3D costs more and runs slower, so apply it only where height or shape is the actual defect.
Buy a smart camera, or build a custom system?
Buy a smart camera for one fixed, well-defined check — it’s running in days and supported. Build a custom system when inspection is your product, you span many lines or products and want one retrainable model estate, your defects need a data-centric approach you control, or images can’t leave your walls. A common answer is both: buy for the easy checks, build for the ones that are your competitive edge.
Is machine vision inspection the same as software quality assurance?
No. Software quality assurance tests code before release; machine vision inspection is quality control of physical goods — a camera checking parts on a production line. They share the word “quality” and little else. If you’re automating software testing, see our guide to AI in software quality assurance; if you’re inspecting real objects, this is the right one.
What to read next
Computer vision
Custom Object Recognition Cameras
The detect-and-classify engineering an inspection system shares, and the vendor-vs-custom buyer’s guide behind it.
Software QA
AI in Software Quality Assurance
The other “QA” — testing software, not parts. Read this if you’re automating test suites, not a line.
Real-time AI
Real-Time Video Processing with AI
Why the frame you hand the model decides everything — capture, latency, and streaming best practices.
Architecture
Edge AI vs Cloud AI Architecture
Why inline inspection runs at the edge, and how to decide where inference should live.
Ready to turn a camera into a pass/fail you trust?
Machine vision inspection earns its place by grading every part the same way, at line speed, and acting on the result before the next one arrives. The method sets what you can catch — rules for measurements, deep learning for cosmetic defects, anomaly detection for the unseen. Accuracy is a tradeoff you tune between escapes and overkill, not a badge you buy. And the engineering that decides success is rarely the model: it’s the lighting, the optics, the threshold, and the tie-in to the line.
Buy a smart camera for a fixed check; build a system when inspection is your product, spans many lines, or has to stay inside your walls. If you want a straight answer on which side of that line you’re on, we’re happy to run it with you. Explore our AI integration services to see where we’d start.
The book · Volume 6 of 7
AI for Video: A Complete Guide to Intelligence in Video Products: From Models and Inference to Computer Vision, Speech, Search, and Generative Video
Once you have picked between rule-based, deep learning and anomaly detection, the hard questions move to models in production. Volume 6 covers detection, tracking, segmentation and OCR, the lifecycle of an AI feature, deployment topologies and the ML minimum you need to make sound calls on accuracy and hardware. Written by Nikolay Sapunov, CEO at Fora Soft.
Read it on Amazon →Kindle & paperback · Fora Soft Video Engineering Handbook
Let’s build inspection you can defend
Whether you need help choosing a smart camera or building defect detection into your own product, we’ll give you an honest read in 30 minutes — buy or build, with the accuracy, false-reject, and integration tradeoffs to back it.