


Why This Matters
If you are an L&D director, an EdTech founder, or a product manager, hotspots are the cheapest way to make a video feel interactive — and the easiest interactivity to ship badly. They are perfect for spatial learning: labelling parts of a machine, pointing out controls in a software demo, letting a learner explore a scene at their own pace. But a hotspot a screen reader cannot find, or a tap target too small for a thumb, fails the learners who need it most and can put a public-sector buyer out of compliance. This article gives you the vocabulary to scope clickable video correctly — what you are buying, how the click becomes trackable data, and the accessibility rules that quietly decide whether your interactive video is usable at all. It is the lighter-weight companion to Branching scenarios, which is the most expensive interactive format; hotspots are among the cheapest.
First, What "Clickable Video" Actually Means
Start with the everyday picture. Think of a museum audio guide: you stand in front of a painting, press the number next to it, and hear the story behind that detail. Clickable video is that idea built into the player. The video plays, and certain things on screen — a button, a labelled part, a region of the picture — respond when you click or tap them, revealing more information, jumping you elsewhere, or opening a resource. The learner stops being a spectator and starts pointing.
Three words cover almost everything in this space, and they are worth keeping separate because they behave differently.
A hotspot is a clickable region placed over part of the video — an invisible or lightly marked area that does something when activated. Think of it as a sticker you can press. A overlay is a timed visual layer drawn over the picture: a caption card, a label, an image, a call-to-action button that appears at a set moment and disappears later. Think of it as a transparency laid on top of the film. An embedded resource is what the click leads to — a pop-up of text, a link to a document, a short quiz, or a jump to another point in the video.
In practice they combine: an overlay appears at 0:45 to mark three parts of a pump, each marked part is a hotspot, and clicking one opens an embedded resource explaining it. Keep the vocabulary straight and the rest of the design — and the tracking — falls into place.
 Figure 1. The anatomy of clickable video. Hotspots and overlays live on a transparent layer above the video; a timeline of cue points decides when each appears.
How It Works Under the Hood
You do not need to be an engineer to make good build-vs-buy calls here, but a one-level-deep mental model helps you ask the right questions.
A web video player is, at heart, an HTML <video> element — the browser's built-in movie frame. Clickable video adds a second, transparent layer stacked directly on top of it, the same width and height as the picture. Hotspots and overlays are ordinary web elements (buttons, boxes, images) positioned on that layer. Because the layer sits above the video, clicks land on the elements, not on the play/pause behaviour underneath.
Two design details make or break this layer. The first is timing: each hotspot or overlay needs to appear and disappear at the right moment. The clean, standards-based way to do this uses WebVTT — the W3C Web Video Text Tracks format, the same standard used for captions — in its metadata mode. A metadata cue is a timed entry that carries a small payload (for example, "show hotspot A here") rather than caption text; the browser fires a cuechange event when the playhead enters or leaves that cue, and your code shows or hides the element in response. WebVTT explicitly supports this: "beyond captioning and subtitling, WebVTT can be used for time-aligned metadata," delivered as name-value pairs in cues (W3C WebVTT, 2019).
The second detail is position. A hotspot pinned to "x = 480 pixels, y = 270 pixels" will land in the wrong place the moment the video is resized for a phone. The fix is to store positions as percentages of the frame — "60% across, 50% down" — so the hotspot tracks the same point in the picture at any size. Every serious authoring tool does this; if you build your own, it is the first thing to get right.
Here is the timing mechanism in miniature, using a metadata track and the standard cuechange event:
// A metadata text track drives timed hotspots over a <video>.
const track = video.textTracks[0];      // kind="metadata"
track.mode = "hidden";                   // active, but not shown as captions
track.addEventListener("cuechange", () => {
  for (const cue of track.activeCues) {
    const spot = JSON.parse(cue.text);   // { id, xPct, yPct, label }
    showHotspot(spot);                   // position in %, render the target
  }
});
That is the entire idea: a timed cue says when, a percentage position says where, and a click handler says what happens. Everything an authoring tool adds — drag-to-place editors, styling, analytics — sits on top of this foundation.
Authoring: Who Builds the Hotspots, and How
The good news for budgets is that you rarely build this from scratch. Authoring tools let a non-engineer drag a hotspot onto a frame, set its start and end time, and choose what the click does. The honest build-vs-buy picture looks like this:
| Tool | What it is | Hotspots & overlays | Standards support | Indicative cost (2026) |
|---|---|---|---|---|
| H5P Interactive Video | Open-source web content type | Navigation hotspots, image hotspots, timed overlays, pop-up resources | xAPI (built in); SCORM/cmi5/LTI via host platform | Free (self-host) / hosted plans |
| Mindstamp | Hosted interactive-video platform | Clickable hotspots, buttons, drawings, embedded media | xAPI / SCORM export | From ~$59/mo |
| Kaltura | Enterprise video platform | Clickable hotspots and overlays linking to content/CTAs | xAPI, SCORM, LTI (LMS-grade) | Enterprise quote |
| Brightcove (ex-HapYak) | Enterprise video + interactivity | Clickable buttons, hotspots, chapters, overlays | xAPI / SCORM export | Enterprise quote |
| Articulate Storyline | Desktop authoring suite | Hotspot triggers, layers (overlays), markers | SCORM 1.2/2004, xAPI, cmi5 | Per-seat subscription |
| Custom build | Your own overlay layer on a player | Whatever you design | Whatever you implement | Project cost; full control |
Table 1. Hotspot and overlay authoring options. The "standards support" column is what lets the interaction be tracked by a Learning Management System or Learning Record Store — a clickable region that reports nothing is invisible to your analytics.
The pattern repeats the one this whole section keeps returning to: free and low-cost tools (H5P above all) cover most needs and are where you should start. The open-source tool H5P offers navigation hotspots that "mark out an area within the video that when clicked direct the viewer to either a specific part of the video or to an external URL," plus image hotspots and timed overlays — enough for the majority of learning use cases at zero licence cost (H5P documentation). You move to a paid platform or a custom build when you need branded players, deeper analytics, single sign-on into a corporate system, or accessibility you can fully control. That last reason — control over accessibility and tracking — is the most common trigger for a custom build, because it is exactly what off-the-shelf tools tend to do unevenly.
Tracking: Turning a Click Into Data
A hotspot that no one can measure is decoration. The job that makes it a learning feature is tracking: recording that the learner clicked, what they clicked, and when, so you can see whether the interactivity is working.
The mechanism is the Experience API (xAPI) — a standard way for the player to write short sentences about what the learner did into a database. Each sentence is an xAPI statement in the form actor – verb – object: "Lena – interacted with – pump-valve hotspot." Those statements are sent to a Learning Record Store (LRS), the database that holds them. For player interactions that are not play, pause, or seek — and a hotspot click is exactly that — the xAPI Video Profile defines the interacted verb specifically: it expresses "that the actor interacted with the player" for actions beyond the basic transport controls (xAPI Video Profile, ADL). That gives you a standards-clean way to log every hotspot activation.
The same clip is still a video, so you can track playback alongside the clicks. The xAPI Video Profile defines the verbs for that too — played, paused, seeked, completed — against the video activity type https://w3id.org/xapi/video/activity-type/video. Combine the two and a single session produces a readable trail: the learner played the clip, interacted with two of the three hotspots, and completed it. For the full treatment of video tracking, see Tracking video with the xAPI Video Profile.
If the video is launched inside a Learning Management System the older way, with the course-packaging standard SCORM, you can still record a hotspot click — but only as one of SCORM's fixed "interactions," and SCORM tracks a limited data model (completion, score, time, a capped interactions set), not the rich, free-form events xAPI allows. This is the recurring standards distinction worth getting right: SCORM tracks completion and a fixed set; xAPI and its Video Profile track whatever interaction you choose to emit. For the difference in full, see SCORM vs xAPI vs cmi5 vs LTI.
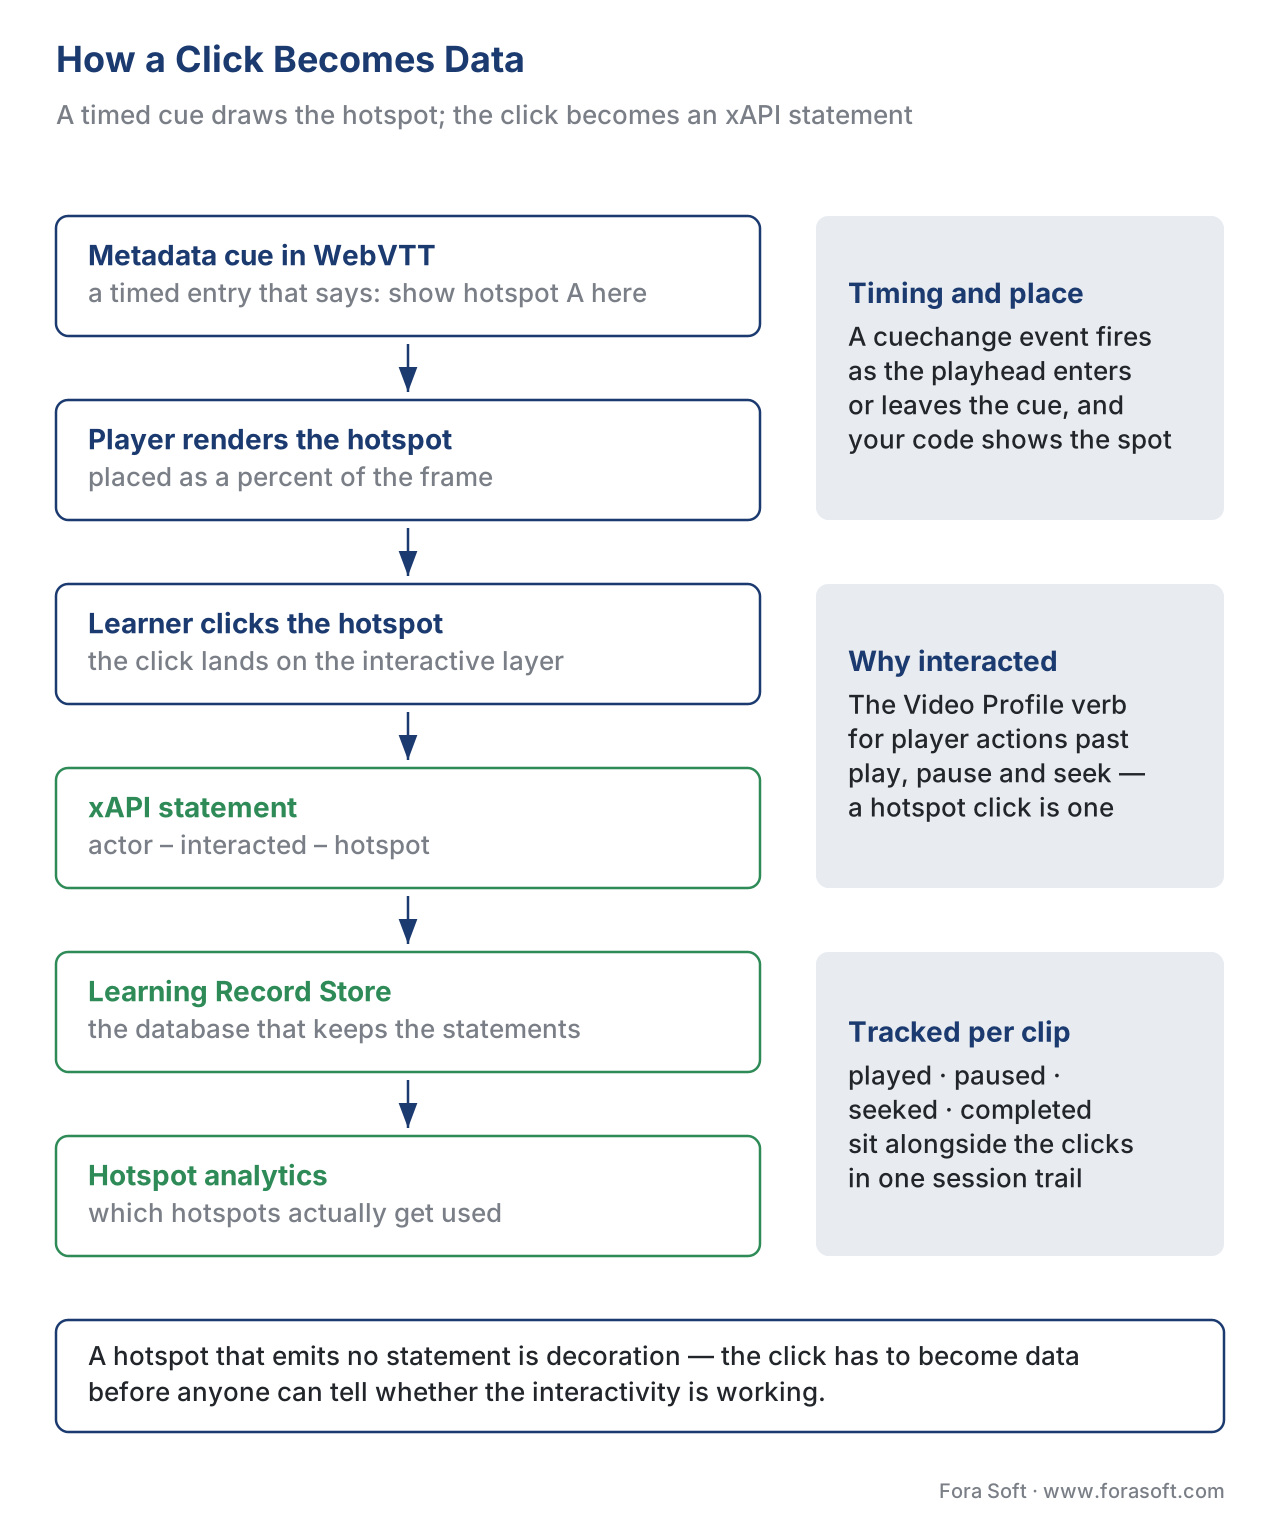 Figure 2. How a click becomes data. A timed cue renders the hotspot; the click fires an xAPI
 interacted statement to the Learning Record Store, where analytics can count which hotspots actually get used.
The Accessibility Trap: Click Targets on Video Are Harder Than They Look
This is the part most interactive-video projects underweight, and it is where Fora Soft sees the most rework. Putting clickable things on top of a moving picture creates accessibility problems that a normal web page does not have. Four rules matter most, and all are part of the Web Content Accessibility Guidelines (WCAG) 2.2 Level AA — the bar that the European Accessibility Act, in force since 28 June 2025, and US Section 508 effectively require.
The target must be big enough. WCAG Success Criterion 2.5.8, Target Size (Minimum), Level AA, requires clickable targets to be at least 24 by 24 CSS pixels, unless they have enough spacing around them or are inline in text (W3C WCAG 2.2). Show the math the first time: a hotspot drawn as a 16-pixel dot fails outright; the same dot passes only if no other target sits within a 24-pixel-diameter circle centred on it. The safe default is to make every hotspot at least 24×24, and 44×44 where it is an important control (the stricter 2.5.5 Enhanced level). On a phone, where fingers are blunt instruments, this is not pedantry — it is the difference between a usable and an unusable lesson.
The target must work without a mouse. WCAG 2.1.1, Keyboard, Level A, means every hotspot must be reachable by Tab and activated by Enter or Space, in a sensible focus order, with a visible focus ring. A hotspot wired only to a mouse click excludes keyboard and switch-device users entirely. This is the single most common failure in home-grown clickable video.
Overlays that appear must be dismissible and stable. WCAG 1.4.13, Content on Hover or Focus, Level AA, governs tooltips and overlays that pop up: the learner must be able to dismiss them, hover over them without them vanishing, and keep them visible until they move away. An overlay that flashes up and auto-hides before a slow reader finishes it fails this — and frustrates everyone.
Don't rely on colour or motion alone. Mark a hotspot with a shape and a label, not just a colour, and never make the only way to find it "spot the thing that's moving." Pair this with captions and audio description for the video itself, covered in WCAG 2.1 AA for educational video.
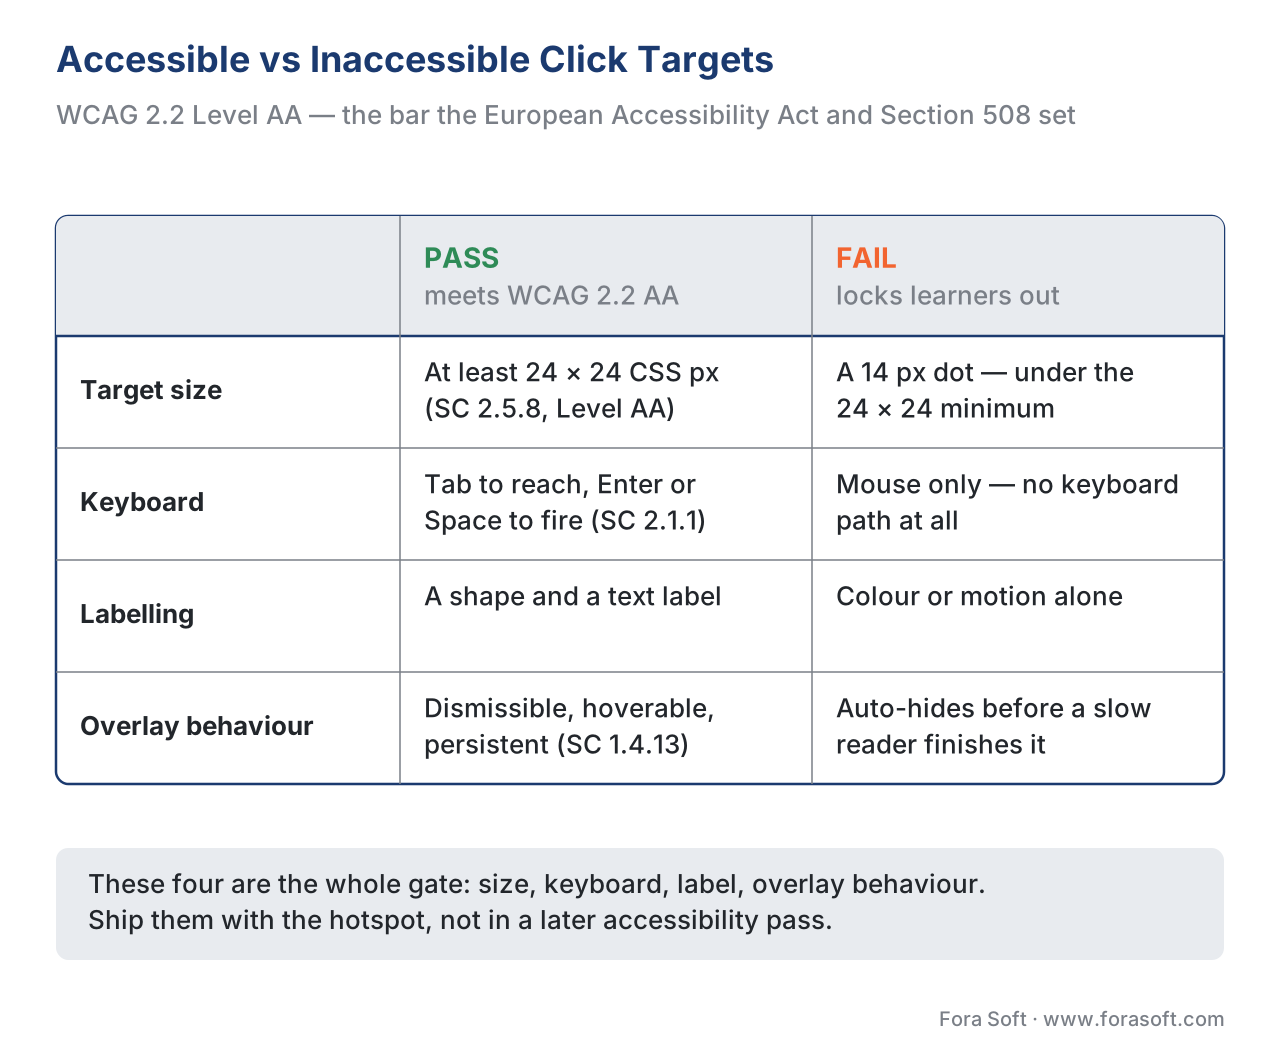 Figure 3. The accessibility line for click targets. A 24×24-pixel, keyboard-focusable, labelled hotspot passes WCAG 2.2 AA; a tiny, mouse-only, colour-only dot fails.
A Common Mistake: Shipping Hotspots No One Can Use or Measure
The pitfall that recurs is treating clickable video as a purely visual task — drag the dots on, ship it — and discovering too late that the dots are invisible to screen readers, too small on phones, and silent to your analytics. The result looks interactive in a demo and fails in production: learners with disabilities are locked out, mobile learners mis-tap, and you have no data on whether anyone clicked anything.
The fix is to treat accessibility and tracking as part of the definition of "done," not a later pass. Every hotspot gets a keyboard path, a 24×24-pixel minimum target, a text label, and an xAPI statement on activation — before the feature is called complete. Decide, too, what a hotspot interaction means for completion: clicking a hotspot is engagement, not mastery, so do not let "clicked all hotspots" masquerade as "learned the material." Tie completion to a quiz result or a passing signal, the way in-player quizzes do, rather than to clicks alone. To make this concrete, the checklist below walks the whole pre-flight in one page.
Download the clickable video accessibility and tracking checklist (PDF)
When a Hotspot Is the Right Tool
Because clickable video is cheap, the question is less "can we afford it" and more "is it the right interaction for the objective." Lead with the job, then the build.
Hotspots and overlays earn their place when the learning is spatial or exploratory: identifying parts of equipment, walking through a user interface, annotating a diagram or a scene, or offering optional "learn more" depth that motivated learners can choose. They let a learner explore at their own pace and reward curiosity, which raises engagement without the production cost of filming alternate paths.
They are not the right tool when you need to measure understanding — that is a job for an in-player quiz, which triggers the testing effect and produces a score. And they are overkill-in-reverse when the objective is practising a consequential decision — that is a branching scenario, which costs far more but teaches judgment. The honest default: reach for hotspots first because they are cheap, add a quiz when you need to grade, and reserve branching for high-stakes judgment.
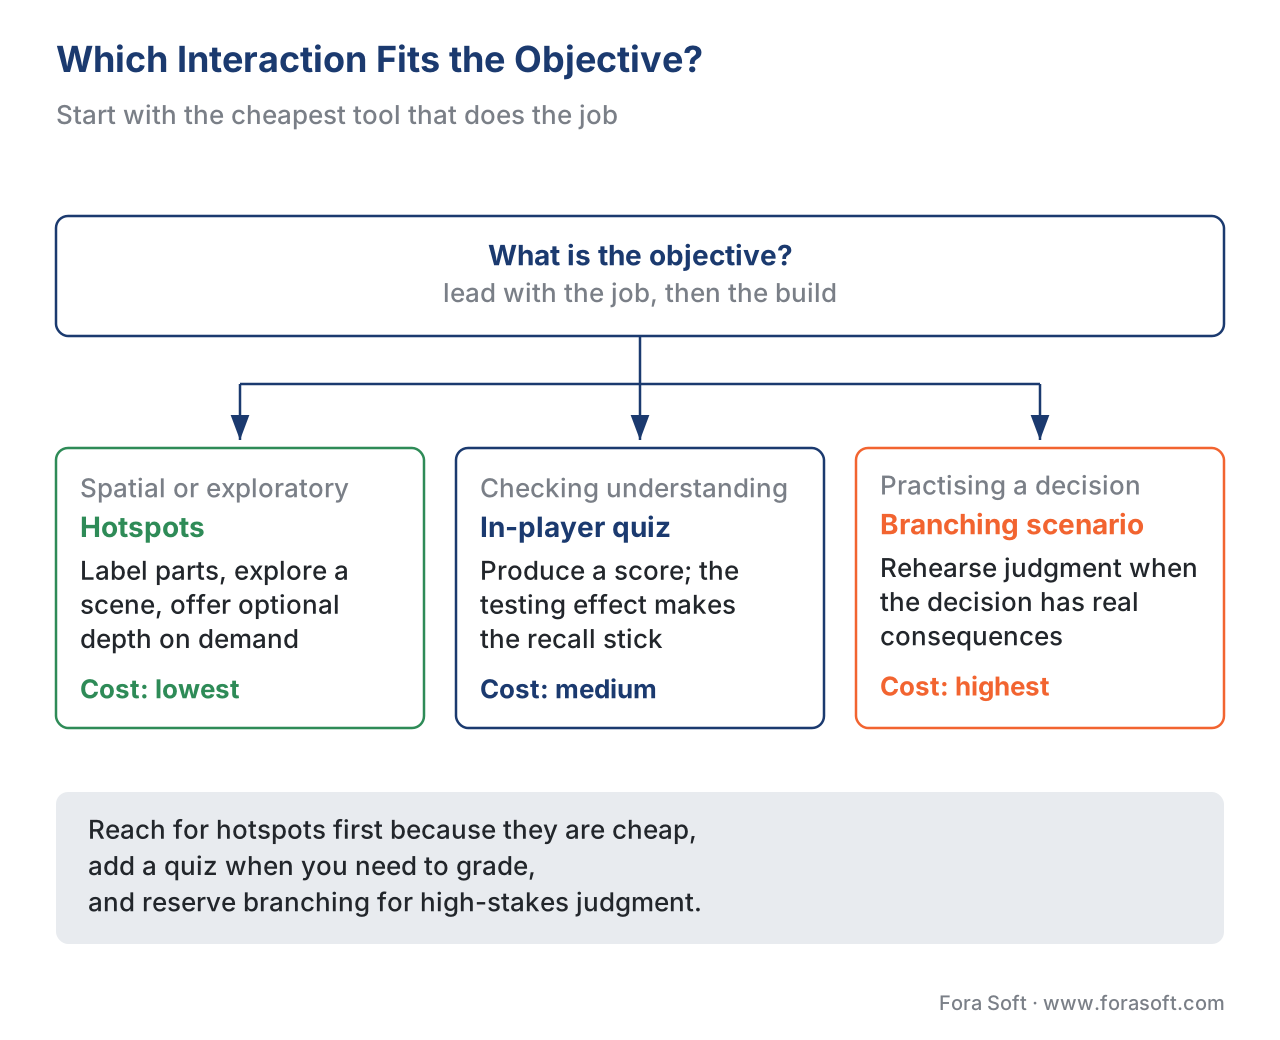 Figure 4. A quick test for the right interaction. Hotspots fit spatial and exploratory learning; a quiz fits measuring understanding; branching fits consequential decisions.
Where Fora Soft Fits In
Fora Soft has built custom video players and interactive video since 2005, and clickable video sits where two of our daily jobs meet: the overlay layer on the player, and the tracking layer that turns a click into learning data. Teams come to us when an off-the-shelf authoring tool cannot give them the accessibility control, the branded player, or the analytics depth they need — when the question shifts from "which tool to buy" to "what to build." We will often say the honest thing: start with H5P or a hosted tool. When a custom overlay engine with full xAPI tracking and WCAG 2.2 AA compliance is genuinely warranted, we build it, with the same team that works across e-learning, video conferencing, OTT, telemedicine, and AR/VR.

The handbook
Fora Soft Video Engineering Handbook
We wrote a seven-volume series that takes the whole video stack apart across 9,000+ pages — encoding, delivery, audio and AI — and someone who works through it can design and build the player these hotspots live on. Volume 3 sits closest to this article: the player itself, timed text tracks and subtitles, trick play, DRM and the economics of delivery — the layer a custom overlay engine plugs into. Volume 4 covers the accessibility and captioning side that decides whether the interaction reaches every learner, and volume 1 the encoding foundation the rest of the course stands on. Written by Nikolay Sapunov, CEO at Fora Soft.
Can every learner reach the hotspots in your video with a keyboard?
Send us the clip, the authoring tool you use today, and the LMS or LRS the data has to land in — and we will come back with what H5P or a hosted tool already covers, what genuinely needs a custom overlay layer, and what the 24×24-pixel and keyboard rules mean for the design you have in mind. 250+ video products shipped since 2005.
See our case studies
Case study
Sprii
A Danish live-shopping platform with €365M+ in cumulative sales, 21M products sold and 72K+ live events, where product overlays sit on the running stream and every output channel — Facebook, Instagram, the brand’s own store — carries its own overlay configuration. It is this article’s overlay layer at commercial scale: the click has to open the right embedded resource in the right context.
Case study
BrainCert
A WebRTC and HTML5 virtual-classroom LMS with 100K+ customers and 500M+ real-time classroom minutes across 10 datacenters, with SCORM and xAPI support, an interactive whiteboard and proctored exams already in the product. That is the tracking half of this article: an interaction counts only once it reaches a standard the institution’s system can read.
Case study
Scholarly
Sydney’s selective-test prep platform: 15,000+ active users and live classes for up to 2,000 students at once, with video, whiteboards, quizzes, LMS and CRM in one system. It is the other branch of the decision here — when the objective is to measure what a learner knows, the interaction you need is a scored quiz, not a hotspot.
What to read next
Interactive video
In-Player Quizzes and Polls: Design and Tracking
The interaction to reach for when the click has to be graded.
Architecture
Building an Interactive Video Player
The overlay layer and the cue plumbing, one level deeper.
Standards
Tracking Video With xAPI: The Video Profile
Every verb the player can emit, not just interacted.
Accessibility
WCAG 2.1 AA for Educational Video
Captions, audio description and the rest of the compliance bar.
References
- Web Video Text Tracks Format (WebVTT), W3C — World Wide Web Consortium. Time-aligned metadata cues and the
cuechange-driven model used to show and hide timed overlays and hotspots. Tier 1. https://www.w3.org/TR/webvtt1/ - WCAG 2.2 Success Criterion 2.5.8, Target Size (Minimum), Level AA — W3C Web Accessibility Initiative. The 24-by-24 CSS pixel minimum for clickable targets, with the spacing, inline, and essential exceptions. Tier 1. https://www.w3.org/WAI/WCAG22/Understanding/target-size-minimum.html
- WCAG 2.2 Success Criterion 2.1.1, Keyboard, Level A — W3C Web Accessibility Initiative. The requirement that all functionality, including hotspots, be operable by keyboard. Tier 1. https://www.w3.org/WAI/WCAG22/Understanding/keyboard.html
- WCAG 2.2 Success Criterion 1.4.13, Content on Hover or Focus, Level AA — W3C Web Accessibility Initiative. Dismissible, hoverable, persistent behaviour required of overlays and tooltips. Tier 1. https://www.w3.org/WAI/WCAG22/Understanding/content-on-hover-or-focus.html
- xAPI Video Profile — ADL Initiative (authored profiles). The
interactedverb for player interactions beyond play/pause/seek, theplayed/paused/seeked/completedverbs, and the video activity type. Tier 1. https://github.com/adlnet/xapi-authored-profiles/tree/master/video - Experience API (xAPI) Specification, Version 1.0.3, Part 2: Statements (Data) — ADL Initiative. The actor–verb–object statement model and the Learning Record Store used to record each hotspot interaction. Tier 1. https://github.com/adlnet/xAPI-Spec/blob/master/xAPI-Data.md
<track>element and the WebVTT API — MDN Web Docs. The HTML metadata text track,track.mode,activeCues, and thecuechangeevent used to drive timed overlays. Tier 6. https://developer.mozilla.org/en-US/docs/Web/API/WebVTT_API- Interactive Video (content type): navigation hotspots, image hotspots, and overlays — H5P / H5P Group. Hotspots that link to a video point or external URL, image hotspots, timed overlays, and built-in xAPI emission. Tier 4. https://h5p.org/interactive-video
- Interactive Video Hotspots — make any video clickable — Mindstamp. Hosted authoring of clickable hotspots, buttons, and embedded media with xAPI/SCORM export. Tier 7. https://mindstamp.com/interactions/hotspots
- Interactive video hotspots — Kaltura Knowledge Center. Clickable areas and overlays linking to content, resources, or calls to action in an enterprise video platform. Tier 4. https://knowledge.kaltura.com/help/vod-587150b-hotspots
- The Effectiveness of Interactive Videos in Increasing Student Engagement in Online Learning — peer-reviewed study (ResearchGate). Evidence that interactive video raises engagement over linear video. Tier 5. https://www.researchgate.net/publication/386117703_The_Effectiveness_of_Interactive_Videos_in_Increasing_Student_Engagement_in_Online_Learning
Where popular sources disagreed with the standards, the standards won: many vendor pages describe hotspots as "fully tracked" and "accessible out of the box," but per the xAPI Video Profile a click is only recorded if the player emits the interacted statement, and per WCAG 2.2 SC 2.5.8/2.1.1 a hotspot is only accessible if it meets the 24×24-pixel target size and is keyboard-operable. Those requirements come from the primary specs, not the vendor summaries.
